
Structuring your Taxi for Email account
Apr 18, 2023
How you structure your Taxi account depends on which teams are going to be using the account and what type of emails you are making in Taxi.
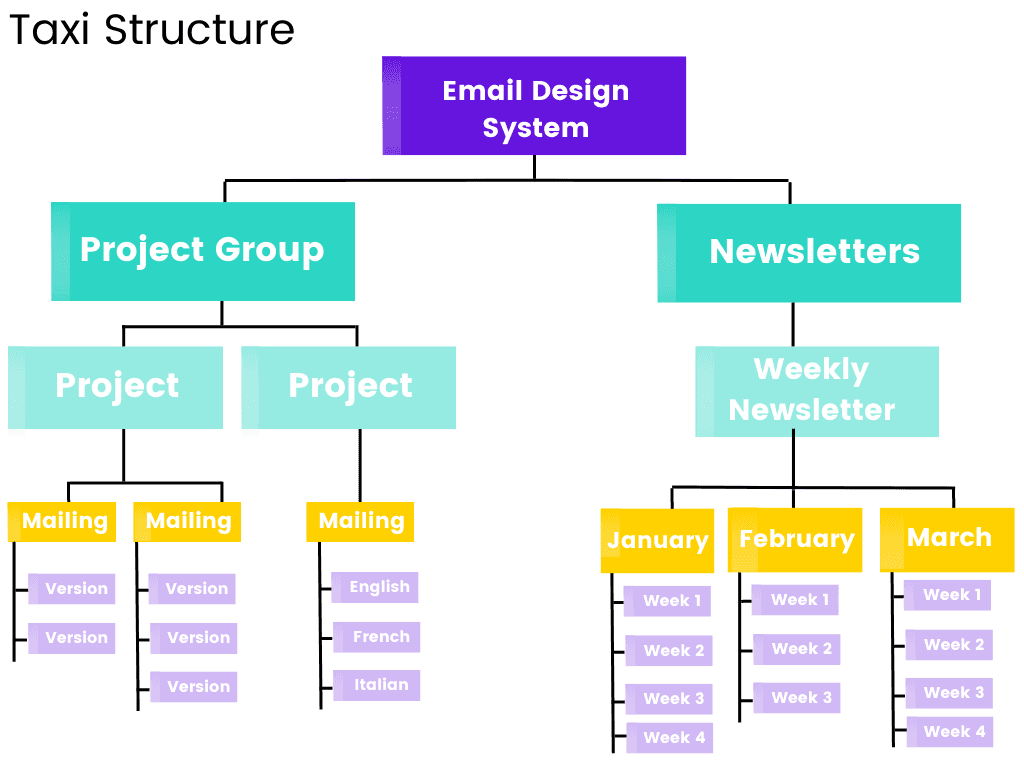
Project Groups
Projects are organised into Project Groups. These Project Groups are the highest level of organisation and can be used to organise related projects and to set group level access and permissions. You can also limit access to Projects so the right people can work on them.
Create a Project Group:
Go to your Organisation Settings in the bottom left hand corner of your Taxi screen and select General
Select the Project Groups tab and select 'Add New'
Enter the details of the Project Group and select 'Create Project Group'
Once the Project Group is created you can add Users to edit all mailings and versions in the Project Group
When you create a new Project you can select the Project Group you want it to be in
Projects
Use projects to organise your mailings into different groups. These projects should align with your email campaigns. An example could be a newsletter project, a welcome series of emails or promotions project. Each project can hold as many mailings as you need.
Create a new Project:
On the home screen, select 'Add New'
Fill in the Project details
Next, you need to fill in the details of the first Mailing that will exist within your project.
You will then need to fill in the Version details
Select 'Create Project'
Mailings
Mailings are the emails you design and build.
Every Mailing belongs to a project in your account, for example, January and February could be 2 mailings in a 'Monthly Newsletter' project.
Create a new Mailing:
Select the Project you would like to add your mailing to
On the Mailings page select 'Add New'
Fill in the details of the Mailing
Next fill in the Version details. Every Mailing must have at least one Version.
Select 'Create Mailing'
Versions
Versions are variants of your email for different audience groups or different languages. The first version is always the Parent Version, which controls all other versions.
Versions are most commonly used to send an email to different languages, as the emails will follow the same design but need different content.
Create a new Version:
Navigate to the Mailing that you would like to add the Version to
On the Versions page Select 'Add New'
Fill in the Version details
Select 'Create Version'
Version Sets
A Version Set is a pre-built group of Versions that you can apply to any Mailing, so all the different Versions you need are created automatically.
This is particularly useful if you often use the same customer groups, product segments, languages etc. You can have different version sets for different customer groups or different teams.
Version sets allow you to create all versions of your email in one click.